Tag hosts
Tag the hosts you manage from Xprotect with Xprotect tags. Tagging can help you filter hosts by tags. You can also use tags to set Auto-delete rules, a feature that deletes unessential, unreachable hosts.
Tag the hosts by any possible rationale that is beneficial for your business/organization. You can tag them by geography, purpose, Line of Business (LoB), department, and so on.
Design notes
-
In Xprotect, tags are labels that you assign to hosts and not key-value pairs. For example, you don't define a key 'Location' and specify names of locations as values. You add labels such as Santa Clara and London to the hosts.
-
Tags can only be assigned to the hosts managed from Xprotect. Other entities such as Policies and Groups cannot be tagged.
-
Tags are case-insensitive.
-
New instances of Xprotect do not contain any default or system-generated Tags. You must add all tags manually.
-
The Hosts > Tags page only lists the tags you created on this Instance. You cannot add tags from this page. You must add tags from the Hosts page.
-
You can delete tags from the Hosts > Tags page, irrespective of whether they have or have not been assigned to hosts.
Add tags
Before you start tagging the hosts, we recommend that you decide upon and make a master list of tags you want to assign to the hosts. Then, assign the tags from the master list. Also, update the master list as and when you add new tags to Xprotect. This is particularly useful when multiple Instance Admins and Tech Support users are managing an Instance.
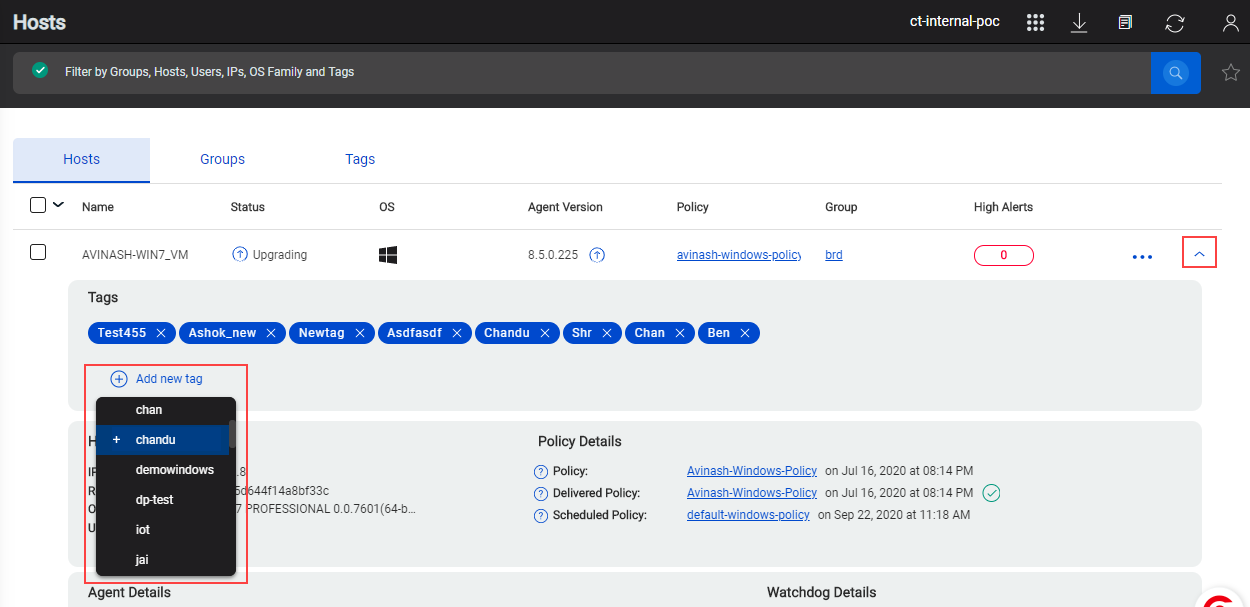
To add a new tag to your Xprotect instance, you must first define and assign the new tag to a host. The tag is then listed on the Tags page, and you can assign this tag to other hosts.
-
Go to Hosts.
-
Click the down arrow next to the first host that must be tagged with the new tag.
-
Click Add new tag and enter the new tag.
-
Click (Add new).
Tags can also be added from the Settings > Configurations page when you add Auto-delete rules. See Schedule Auto-deletion of unessential Unreachable hosts for more details.
Tag hosts
Ensure that you don't tag 'essential' hosts with the tags you are using for Auto-delete rules (for unessential, unreachable hosts).
Multiple hosts
When you select multiple hosts for tagging, you will see the collective list of tags that the hosts are already using. The numeral next to a tag denotes how many of the hosts you selected are using the tag.
|
Single host
You don't need to save a tag assignment this way specifically. Assigning the tag automatically saves the tag assignment.
-
Click the down arrow next to the host that must be tagged.
-
Click Add new tag and add One or more tags.
Edit or delete tags
If you are using many tags, filter the Tags page by the name of the tag to find the tag you are looking to edit or delete.
-
Click Edit next to a tag and edit or delete the tag.
See tagged hosts
|
Next steps
-
Use tags to define Auto-delete rules to delete the entries of unessential, unreachable hosts from the Hosts page. See Schedule Auto-deletion of unessential Unreachable hosts for more details.


